You can streamline the process of mapping accounts to master accounts in any account map by creating automapping rules. Automapping rules enable you to map large numbers of accounts automatically to master accounts in an account map based upon whether or not the account codes meet the criteria of the rules. Not only do automapping rules make the account map creation process less laborious, but, based upon the way they're configured, they can enable you to add accounts to charts of accounts and be assured that account maps are updated accordingly on an ongoing basis without your further intervention.
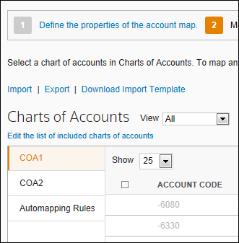
If an account map has at least one chart of accounts, a tab for automapping rules appears as shown in the example below.

When you click the Automapping Rules tab in an account map, you can access the list of automapping rules of an account map where you can manage their creation, editing, deletion, and order of application.
When you create an automapping rule for an account map, it appears as an item in the Automapping Rules tab. These items behave just like account items in any chart of accounts tab in that they can be mapped to master accounts, except that you can set up automapping rules to represent multiple accounts. In dragging a single automapping rule to a master account, you are effectively mapping every account code that meets the criterion of the rule to that master account.
The structure and function of an automapping rule
An automapping rule is the description of a group of accounts in the active account map. Regardless of whether those accounts are from all charts or just one chart, the group of accounts is defined by some common characteristic of their account codes.
Assume for example that all of the accounts in your charts of accounts that pertain to cash have a similar account code format. Perhaps their account numbers all begin with the number 100. You can create an automapping rule for your cash accounts that represents all accounts whose numbers begin with 100. When you map that rule to a master account, all accounts that begin with 100 are effectively mapped to that master account. Furthermore, as you or your associates add accounts that begin with 100 to the charts of accounts included in the account map over time, these accounts will automatically be mapped to the master account as well in keeping with the rule.
When you click the Create button at the top of the Automapping Rules tab in an account map, the Create Automapping Rule popup appears. The popup contains the following fields:
Chart of Accounts - Choose the chart of accounts whose accounts you want the automapping rule to affect. The default value of this field is All, so if you do not make a choice the rule will be applied to the accounts of every chart in the account map.
Account # - Choose the characteristics of the account codes that you want the automapping rule to affect. Possible values for Account # are Begins with, Ends with, Contains and Matches.
Criterion- Enter the numbers that should be present in the codes of the accounts the automapping rule should affect. In this field you'd enter what automapped account numbers should begin with, end with or contain. Enter as many characters as you require to represent the portion of the account numbers you're targeting. If you chose Matches in the Account# field, you'd enter a full account number that you want the automapping rule to affect.
Description - Enter a description for the automapping rule. The description you enter appears in the Description column of the Automapping Rules tab.
Enter automapping rule information and then click Save.
To edit an automapping rule, select the rule in the Automapping Rules tab and then click Edit. Enter your changes in the Edit Automapping Rule dialog that appears and then click Save.
If you've set up automapping rules in another account map, you can copy them to the Automapping Rules tab of the active account map as long as no rules exist in the tab already. To copy automapping rules from another account map, click the Copy From button at the top of the grid in the Automapping Rules tab of the active account map. In the Copy Automapping Rules dialog that appears, choose the account map and the year of the map whose automapping rules you want to copy. Then click Copy. (If automapping rules already exist in the current account map, the Copy From button will not be active.)
When you copy automapping rules from another account map to the active map, the ways the rules are mapped to master accounts are not copied along with them. In other words, the rules will not be mapped to any master accounts in the active map as part of the copy procedure. Instead, you will have to map the copied rules to master accounts as necessary. If you copy automapping rules that reference a specific chart of accounts that is not included in the active account map, the Chart of Accounts selection of those rules will be set to All by default in the active account map.
Mapping an automapping rule to a master account
To map an automapping rule to a master account, simply drag it from the Automapping Rules tab on the left to the appropriate master account on the right just as you would drag an account code in a chart of accounts to a master account. This single action has the effect of mapping every account affected by the rule to the same master account.
When you map an automapping rule, accounts affected by the rule are highlighted in green in their respective tabs in the left pane. You can still map those accounts to other master accounts by manually dragging them as you normally would. This creates an "exception" to the automapping rule. No account that you map manually can be affected by an automapping rule.
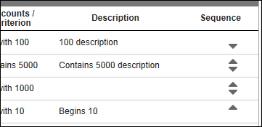
General Ledger Manager performs the mapping of accounts required by each automapping rule that is mapped to a master account in consecutive order from top to bottom of the list of rules. Therefore, the account code to master account code mapping required by the first rule in the list precedes that of the second rule and so forth. You can arrange the sequence of automapping rules in the Automapping Rules tab to ensure that the mapping required by certain automapping rules is completed before that of other rules in the list. Each item in the Automapping Rules tab in an account map has arrow head icons in the Sequence column that you can click to adjust the rule's position in the list. Click the up arrow associated with a rule to move the rule up one position in the list, and click the down arrow to move the rule down a position in the list. The sequence that you establish for the automapping rules in the tab applies to the entire account map, including all of its RU exceptions, if any.

Sequencing is a crucial part of automapping rule implementation, particularly if the rules you create deal with accounts with similar codes.
Consider the following sequence of account numbers:
1099876
1008761
1000542
Assume that these accounts were to be automapped to master accounts by these automapping rules:
Begins with 10
Begins with 100
Begins with 1000
If the rules appeared in the list in the Automapping Rules tab in the order above, the second and third rules would have no effect on how account codes are mapped to master accounts since all of the accounts begin with 10. In other words, the first rule is broad enough to cover all of the codes in the example causing them all to be mapped and leaving no codes for the more restrictive rules to map. However, if you rearranged the rules in inverse order, all three accounts would be affected by different rules and could be automapped to different master accounts.
Automapping rules with import and export
Automapping rules cannot be imported into an account map. If you export the mappings in an account map to an Excel workbook, automapped accounts are represented in the export as if you had mapped them to their master accounts manually.